


1. Introduction
Migrating from Wix to WooCommerce represents a significant step toward greater control, flexibility, and cost-effectiveness for your online store. This comprehensive guide addresses the key challenges and benefits of making this transition, providing both manual CSV methods and automated solutions using the official Wix to Woo Migration extension.
Who this guide is for
– Wix store owners looking to migrate to a more flexible, well optimized & cost-effective platform.
– Developers and technical consultants who require fine-tuned control over data, design, and functionality will find this approach a good starting point.
– Digital agencies handling multiple store transitions.
– Business owners seeking greater control over their ecommerce operations.
Key benefits of WooCommerce
Switching from Wix to WooCommerce provides distinct advantages that cater to businesses of all sizes:
- Open-source flexibility
WooCommerce, built as an open-source plugin for WordPress, empowers you with limitless possibilities. Unlike Wix’s closed ecosystem, you can tweak every aspect of your store — code, design, and functionality — to align with your unique vision. - Complete control over hosting and data
With WooCommerce, you’re not locked into a hosted platform like Wix. You can choose a hosting provider that meets your business requirements with managed WordPress hosting optimized for WooCommerce for a seamless setup. You’ll also retain complete ownership of your store’s data and infrastructure. - Cost-effectiveness for scaling
Wix offers a subscription-based model with additional costs that may apply depending on your plan, apps, or premium features. WooCommerce, on the other hand, is open-source and free to start with, offering flexibility in choosing extensions and services as your store grows. - Advanced payment solutions: For payments, WooCommerce offers WooPayments, a fully integrated solution that simplifies transactions with competitive rates, support for recurring payments, over 100 currencies supported, and unified dashboard management. This helps store owners streamline operations as they grow.
- A wide range of customizations and added functionality
WooCommerce integrates seamlessly with WordPress’s robust content management system, combining ecommerce with advanced blogging, SEO tools (e.g., Jetpack Boost), and marketing features. With thousands of plugins, extensive themes, and direct code access, you can tailor your store to meet any need, far beyond Wix’s predefined templates and controlled app marketplace.
Wix: user-friendly but limited
Wix offers a user-friendly, drag-and-drop website builder with built-in ecommerce functionality, but its simplicity has trade-offs. Its subscription model and added fees can strain budgets as your store scales, while customization is restricted to what its ecosystem allows. Wix retains control over your store’s backend and data, limiting creativity and locking you into its ecosystem.
WooCommerce: A flexible alternative
By contrast, WooCommerce hands users the reins. Host it anywhere, customize it endlessly, and integrate it with WordPress’s powerful tools — all while avoiding Wix’s recurring costs and restrictions. The active WordPress community and extensive documentation further ensure users are supported every step of the way.
WooCommerce support and community
WooCommerce benefits from a large, passionate, and active global community. Whether you need troubleshooting help, development advice, or inspiration, resources are always within reach:
- Extensive official documentation and tutorials.
- A responsive support ticket system for premium extension users.
- A vast number of developers, freelancers, and agencies are experienced in WooCommerce.
- Community forums, Slack groups, and local WordCamps where you can connect with fellow store owners and WordPress experts.
This vibrant ecosystem ensures that you’re never alone, whether building your first store or scaling an existing one.
Migration overviewTo migrate from Wix to WooCommerce, the process typically involves three main phases:
- Backing up your Wix data to ensure all information is preserved before making any changes.
- Setting up WordPress and WooCommerce as your new ecommerce platform.
- Transferring store data, including products, customers, and orders.
- We’ll start by walking you through a manual CSV export/import process for products — ideal for users who prefer full control or want to better understand what’s happening behind the scenes.
- For customers and orders, we’ll use WordPress plugins that simplify the process without requiring advanced technical knowledge.
- Finally, we’ll introduce a more streamlined, all-in-one solution using premium migration plugins — the most scalable and efficient way to handle the full migration in one place.
While the manual method offers transparency and flexibility, it has limitations in terms of time and complexity. That’s why we ultimately recommend the plugin route for most users, but we’ll cover both paths in detail so you can choose what works best for your needs.
- Setting up essential store functionality, such as a payment gateway like WooPayments, which supports major credit and debit cards, Apple Pay, Google Pay, and various local payment methods.
- Customizing your WooCommerce store using themes and plugins to match your brand’s look and feel.
- Testing and launching your new store with confidence.
While migrating to WooCommerce offers significant long-term benefits, it’s important to understand the challenges you may encounter. The good news is that each of these challenges has practical solutions, especially with the tools and methods covered in this guide:
- Data transfer complexity between different platform structures: Wix and WooCommerce use different data formats, which means product information, customer data, and order history need to be converted and mapped correctly. Solution: This guide provides detailed field mapping tables (see manual data migration process) and automated tools like the Wix to Woo Migration extension (covered in Section 5.2) that handle most of this conversion automatically. For non-technical users, the extension-based approach is highly recommended as it requires minimal manual work.
- Potential temporary SEO impact during transition: Search engine rankings may temporarily dip as search engines discover and re-index your new site structure. Solution: This guide includes comprehensive SEO preservation strategies in Section 4.5: SEO and URL migration and Section 9: Common pitfalls and solutions, including setting up 301 redirects, preserving meta data, and submitting updated sitemaps. With proper planning, most stores recover their rankings within 2-4 weeks.
- Learning curve for new platform interface: WordPress and WooCommerce have a different interface than Wix’s drag-and-drop editor, which may feel unfamiliar at first. Solution: WordPress offers extensive documentation, video tutorials, and a large community for support. Many hosting providers offer managed WordPress hosting with setup assistance. Additionally, page builders like Elementor or Beaver Builder can provide a Wix-like visual editing experience if you prefer that workflow. The WooCommerce dashboard is intuitive and becomes familiar with regular use.
- Initial setup time investment: A complete migration typically requires 1-3 weeks depending on store size and complexity. Solution: Break the process into manageable steps (as outlined in this guide), work in a staging environment to avoid disrupting your live store, and consider using the automated migration extension to significantly reduce manual work. For time-constrained store owners, professional migration services (see Section 5.3: Professional migration services) can handle the entire process.
- Need to recreate custom design elements: Your Wix store’s visual design won’t automatically transfer, requiring theme selection and customization. Solution: Section 6: Design and customization provides step-by-step guidance for replicating your Wix design, including theme selection, color schemes, typography, and layout customization. Many WooCommerce themes offer extensive customization options through the WordPress Customizer, requiring no coding knowledge. Taking screenshots of your current Wix design (as recommended in Section 2.4) will help you recreate the look and feel.
For Non-Technical Store Owners: If you’re not comfortable with technical tasks, consider using the Wix to Woo Migration extension for automated data transfer, hiring a WooCommerce expert for setup assistance, or using a managed WordPress hosting service that provides migration support. Many store owners successfully complete migrations by following this guide step-by-step, taking their time, and testing thoroughly in a staging environment before going live.
Prefer expert help? Codeable’s certified WooCommerce specialists can handle your full Wix-to-WooCommerce migration for you. Click here to view their available plans and receive a free estimate from their experts.
2. Pre-migration planning
2.1 Current Wix setup assessment
Before beginning migration, conduct a thorough audit of your current Wix store. Ensure you have full access to your Wix admin dashboard. This is essential for managing your store, exporting necessary data, and generating credentials (like API keys) required for a smooth migration to WooCommerce. Without full access, you may face limitations when retrieving critical data or setting up integrations.
Product inventory assessment
Product Count and Complexity:
- Total number of products in your catalog
- Product variations (size, color, material options)
- Digital vs. physical products
- Product categories and subcategories
- Custom product fields or attributes
- Product images and media files
- Inventory tracking requirements
- Pricing structures (regular, sale, bulk pricing)
Content assessment
Website Content:
- Static pages (About, Contact, Privacy Policy, Terms)
- Blog posts and articles
- Media files (images, videos, documents)
- SEO metadata and descriptions
- Custom forms and contact information
- Testimonials and reviews
Customer data assessment
Customer Information:
- Total number of registered customers
- Customer account information and preferences
- Order history and purchase patterns
- Customer groups or segments
- Subscription or membership data
- Customer communication preferences
- Loyalty program participation
Technical integrations assessment
Current Integrations:
- Custom code or scripts
- Payment gateways and processors
- Shipping providers and calculators
- Email marketing platforms
- Analytics and tracking tools
- Social media integrations
- Third-party apps and widgets
Before moving forward, review the WooCommerce hosting requirements to ensure compatibility. Choose a provider that offers scalability, regular backups, and WooCommerce-friendly support.
Minimum technical requirements
Server Requirements:
- PHP version 7.4 or higher (8.3+ recommended)
- MySQL version 5.6 or higher (8.0+ recommended)
- WordPress memory limit of 256MB or higher
- HTTPS support (SSL certificate)
- Reliable uptime (99.9% or better)
- Regular automated backups
- Staging environment capabilities
Performance Considerations:
- SSD storage for faster database queries
- Content Delivery Network (CDN) support
- Caching mechanisms (server-level and plugin-based)
- Scalable resources for traffic spikes
You can find WooCommerce-compatible hosting providers through the official hosting recommendations on WooCommerce.com.
2.3 Domain and SSL considerationsDecide whether you’ll transfer your domain or just update the DNS settings to point to the new WooCommerce site.
Next, an SSL certificate will need to be set up to enable HTTPS and secure customer data, protecting sensitive information during transactions and improving SEO.
Refer to the WooCommerce SSL Setup Guide for configuration steps.
Domain transfer options
- Transfer Domain: Move domain registration to new host
- DNS Update: Keep domain with current registrar, update DNS
- Use subdomain during development and testing
SSL certificate setup
- Update any hardcoded HTTP references in content
- Ensure SSL certificate is active before migration
- Test HTTPS functionality
Before proceeding with any critical actions, make sure to follow these two essential best practices:
- Back up your WooCommerce database before starting any import process.
The backup process varies depending on your hosting platform—many hosts provide automated backup tools in their control panel (cPanel, Plesk, or custom dashboards), while others offer one-click backup plugins. If you’re unsure how to back up your database, contact your hosting provider’s support team; they can guide you through the process specific to their platform. Alternatively, you can use WordPress backup plugins, which work across most hosting environments. - Run a test import with a small file to verify everything works correctly before importing the full dataset.
Wix data export process
During this process, each part of your Wix store – products, order history and customers – will need to be exported separately and we explain how to do this below. Please also note that Wix doesn’t include media files in its exports, but we have covered how to handle migrating images further below as well.
1. Export products from Wix- Log into your Wix dashboard.
- Click on the site you want to edit, if you have more than one site in Wix.
- Navigate to Catalog → Products
- Click More Actions → Export.
- Select CSV format compatible with spreadsheet editors like Excel or Google Sheets
- Download the exported file.
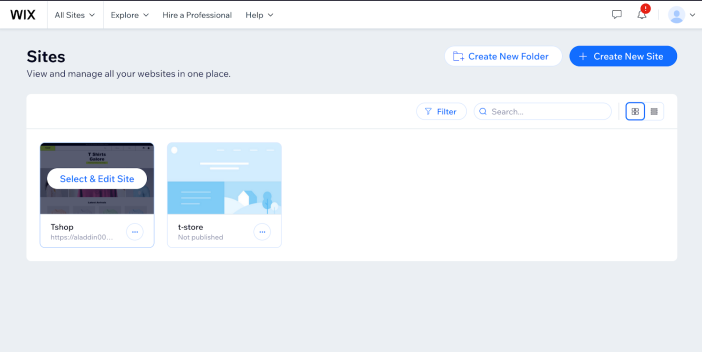 Wix Sites Dashboard
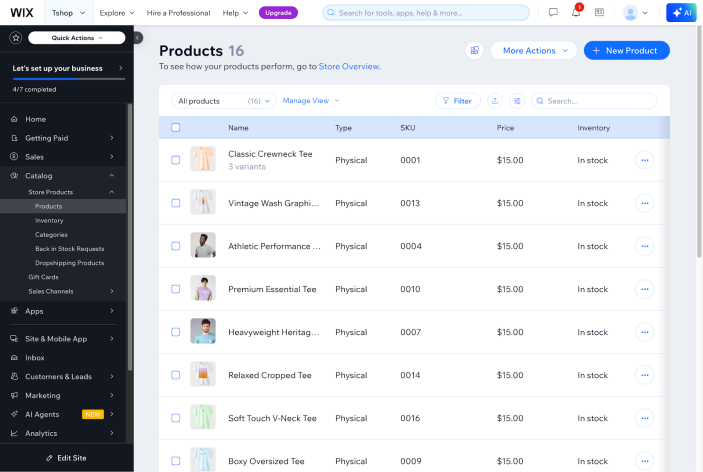 Wix Export Products
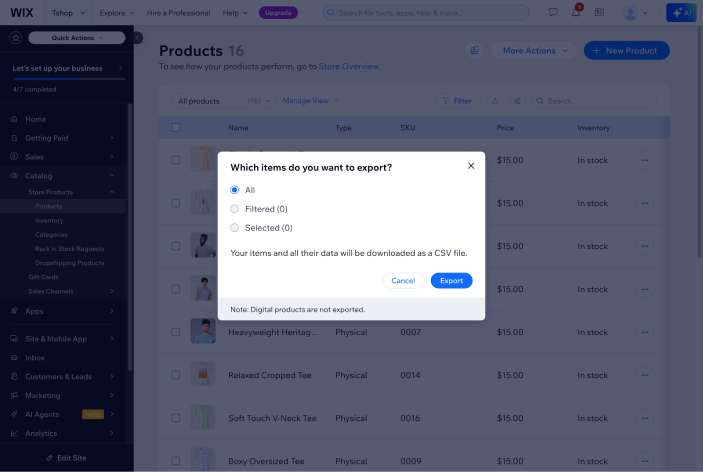 Wix Export Products Confirm
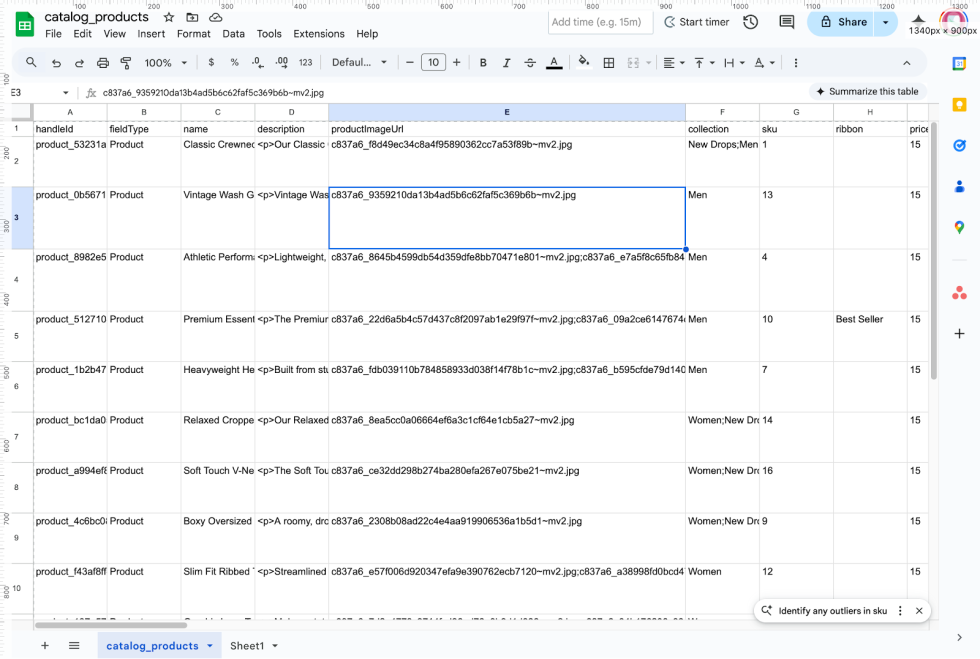 Wix Example Products Export
- Why It’s useful: This CSV backup contains product titles, descriptions, variants, prices, and inventory. It’s helpful if products are accidentally deleted when editing in bulk offline or importing them into another platform.
- Best practices: Since product images are not embedded in the CSV and are instead referenced by URL, ensure that these image URLs remain accessible online. Regularly save the CSV in UTF-8 format to preserve characters and store it on cloud storage with version history or encrypted local drives for security.
- Go to Customers & Leads → Contacts
- Select all contacts or filter as needed
- Click Export → Export to CSV
- Save the customer data file
Important: Wix exports contact information but not customer passwords. Customers will need to reset their passwords on the new WooCommerce store.
- Why It’s Useful: These backups preserve your buyer history, which is helpful for sales analysis or importing into CRMs. However, due to security rules, passwords can’t be exported.
- Important Note on Order Linking: When migrating both customers and orders, it’s crucial to import customers first before importing orders. This ensures that orders in WooCommerce will be properly linked to customer accounts. If customers aren’t imported first, orders may not be associated with the correct customer accounts, which can affect order history visibility and customer account functionality. For detailed information on maintaining customer-order relationships during migration, see Section 4.3: Order migration, which covers order import requirements and limitations.
- Best Practices: Use the UTF-8 format to preserve special characters. Store these files on secure, access-controlled cloud drives. Update your backups regularly to reflect new orders and customers.
 Wix Export Contacts
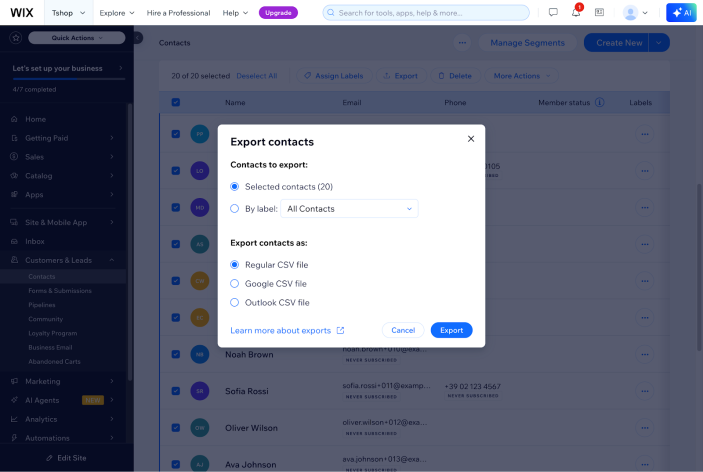 Wix Export Contacts Confirm
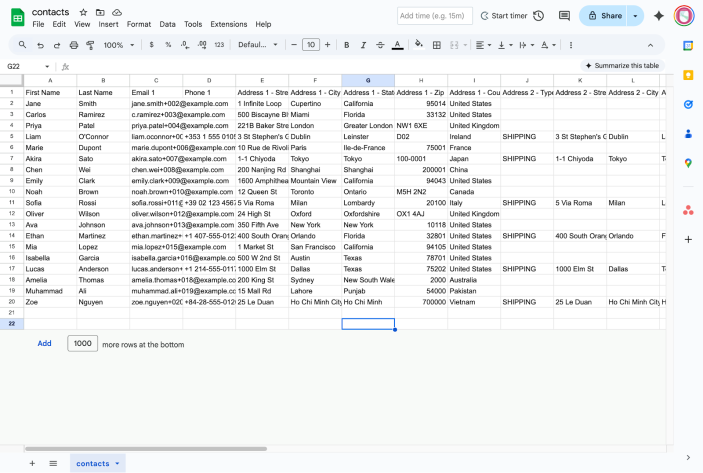 Wix Example Contacts Export
3. Export orders
Wix Example Contacts Export
3. Export orders
- Navigate to Sales → Orders
- Use date filters to export in batches if needed
- Click Export → Export to CSV
- Download order history
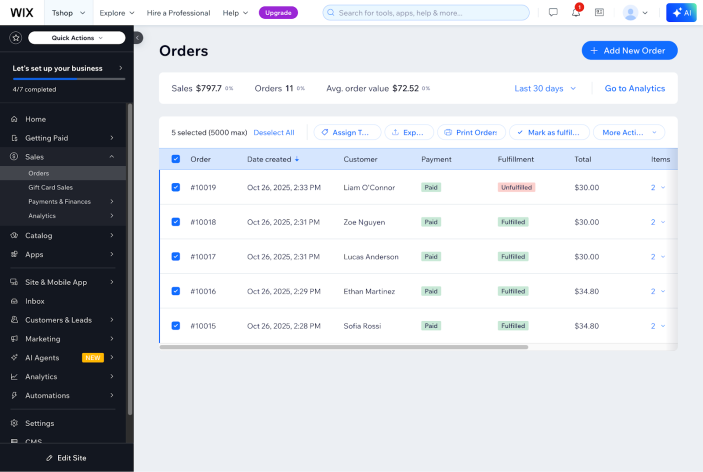 Wix Export Orders
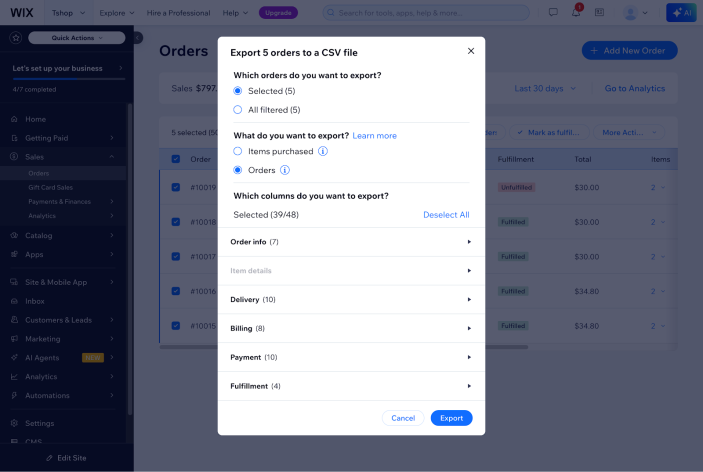 Wix Export Orders Confirm
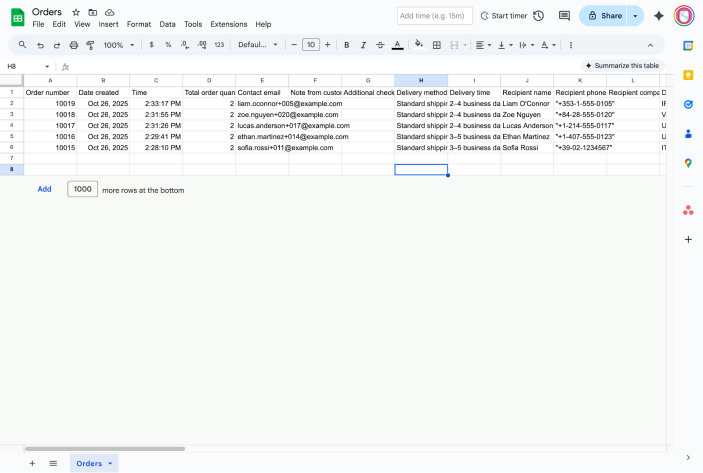 Wix Export Orders Example
Note: Order export may be limited depending on your Wix plan and the volume of orders.
4. Content and media backup- Manually copy all page content from each Wix page.
- If you are using Wix Collections, you can follow this guide to export the data.
- Navigation structure and menu organization.
- Document custom forms and their configurations.
- Design screenshots for reference during theme customization.
Media files backup:
Wix doesn’t bundle media (like product images, banners, or blog images) in its exports. You must:
- Manually download media from:
- Product pages (image URLs in the CSV)
- Media Manager section in the Wix admin
- Or use third-party tools or browser extensions to download image assets from URLs in batches
Why you should back up
These backups are essential for rebuilding your storefront, especially if files are corrupted or deleted during migration.
- Identify and securely store:
- Product images
- Banner images
- Logo and favicon
- Blog images
- Uploaded files and documents
- Storage tips:
- Organize backups into folders by type, such as orders, media, products, etc.
- Use cloud storage with access control (e.g., Google Drive, Dropbox Business)
- Optionally, keep a local encrypted copy on a secure external drive for redundancy
- Freeze window: schedule a short content freeze before launch to avoid divergent orders/customers.
3. Setting up WooCommerce
3.1 WordPress and WooCommerce installation
WooCommerce is a plugin that extends WordPress into a fully featured ecommerce platform. Before you can use WooCommerce, you must install WordPress on your hosting server.
Step 1: Install WordPress
- Installation steps:
- Follow the Official WordPress Installation Guide.
- Access your hosting control panel
- Use one-click WordPress installer (if available through your host)
- Or manually upload WordPress files via FTP
- Complete the 5-minute WordPress installation
This setup gives you flexibility and control but requires more manual configuration compared to all-in-one platforms like Wix.
Step 2: Install WooCommerce plugin
- Log into WordPress Admin dashboard (WP Admin)
- Navigate to Plugins → Add New
- Search for “WooCommerce”
- Click Install Now → Activate
- After WordPress is installed, install the WooCommerce plugin from the WordPress plugin directory.
- Check out the WooCommerce Setup Guide for help configuring basic settings such as currency, shipping, and payment gateways.
Step 3: WooCommerce setup wizard configuration
Store details:
- Store address and location (Configuring settings)
- Currency and units (Configuring settings)
- Tax settings (Setting up taxes)
Payment methods:
- WooPayments (fully integrated payments)
- WooCommerce PayPal Payments (recommended for quick setup)
- Stripe (for credit card processing)
- Additional gateways as needed (Payment gateways catalog)
Shipping configuration:
- Shipping zones (Docs) and methods (Docs)
- Free shipping thresholds (Free Shipping method)
- Shipping classes (if needed) (Product shipping classes)
Additional features:
- Facebook for WooCommerce (optional)
- Jetpack integration (optional)
- WooCommerce Shipping (optional)
- Klaviyo for WooCommerce (optional)
With the core setup complete, the next step is choosing a theme that dictates your store’s design and user experience.
How to choose a theme:
- Go to Appearance > Themes in WP Admin.
- Click Add Theme and search for a WooCommerce-ready theme.
- For a lightweight and highly compatible theme, check out Storefront , the free, official WooCommerce theme.
- For additional themes, check out our selection of themes on WooCommerce.com. Alternatively, browse the WordPress.org theme directory, which offers a wide variety of free and premium themes designed for WooCommerce.
- Preview themes to ensure they support your store’s needs (e.g., product grids, cart pages, variable product displays).
Recommended WooCommerce themes
- Storefront (Official WooCommerce theme – Free)
- Woocommerce.com Themes Store.
- WordPress.org Woocommerce ready themes.
Theme installation and customization process
- Install and activate your chosen theme.
- Customize to match your Wix store’s branding.
- Go to Appearance > Themes > Customize to open the WordPress Customizer, which is only available for classic themes.
- Adjust key elements to mirror your Wix store:
- Logo: Upload your existing logo under Site Identity.
- Colors: Set primary, secondary, and accent colors (e.g., via Colors or Additional CSS) to match your Wix palette.
- Typography: Choose fonts that align with your brand (e.g., via Typography settings or a plugin like Easy Google Fonts if needed).
- Layout: You can configure headers, footers, and product page layouts to replicate your Wix design, such as sidebar placement and button styles.
- Use the theme’s WooCommerce-specific options (if available) to tweak shop pages, product listings, and checkout design.
- Preview changes live and publish once satisfied.
- For more in-depth customization, edit CSS or template files via Appearance > Theme Editor (make a backup first) or use a child theme to preserve updates.
Note on block themes
Some newer WordPress themes use the block theme system, which replaces the Customizer with the Site Editor.
If your theme does not show Appearance > Themes > Customize, go to Appearance > Editor to open the Site Editor, where you can adjust templates, layouts, colors, typography, and other design settings.
3.3 Essential plugin installationPlugins extend the functionality of your WooCommerce store. While the core plugin covers basic ecommerce needs, additional tools enhance customer experience, performance, visibility, and security.
Recommended categories:
- SEO (Search Engine Optimization): Helps search engines find and rank your products, driving organic traffic. Look for extensions that support meta tags, schema markup, and sitemaps.
- Security enhancements: Protects your store from unauthorized access, malware, and fraud. Standard features include firewall integration, login protection, and monitoring tools.
- Performance tools: Improve loading speed and optimize images for a better user experience.
- Backup solutions: Regularly back up your files and database to avoid data loss and ensure business continuity.
- Migration assistance: If you’re still transitioning from Wix, consider plugins that streamline the import of products, customers, and orders.
- Business services: Discover a handpicked selection of essential services to support and grow your business.
Core plugins for migration
Migration Tools:
- Import Export Suite for WooCommerce (for CSV imports)
- Wix to Woo Migration (official extension)
When selecting plugins:
- Review ratings, update history, and compatibility with your current WordPress version.
- Prioritize plugins from reputable developers or the official WordPress plugin repository.
Note: To keep your site lightweight and secure, only install plugins you need and from verified sources.
Resources and guides:
4. Manual data migration process
4.1 Product migration
Manual migration provides complete control over the data transfer process and is essential when automated tools aren’t available or suitable for your specific needs.
Product migration: CSV conversion and field mapping
Understanding Wix product export formatWix Product CSV Structure: Wix product exports typically include these fields:
Core Product Fields:
handleId: Unique product identifier (e.g., “product_53231adc-aa76-5e64-b7ab-5e9264344b63”)fieldType: Always “Product” for main product entriesname: Product name/titledescription: HTML-formatted product descriptionproductImageUrl: Main product image filename (e.g., “c837a6_f8d49ec34c8a4f95890362cc7a53f89b~mv2.jpg”)collection: Semicolon-separated categories (e.g., “New Drops;Men”)sku: Product SKU coderibbon: Product badge/label (e.g., “Best Seller”)price: Regular price as decimal (e.g., “15.0”)surcharge: Additional feesvisible: Boolean visibility status (true/false)discountMode: Discount type (“PERCENT” or “FIXED AMOUNT”)discountValue: Discount value (e.g., “0.0”)inventory: Stock status (“InStock”, “OutOfStock”)weight: Product weightcost: Cost of goodsbrand: Product brand
Product Options/Variations:
productOptionName1: First variation attribute (e.g., “Size”)productOptionType1: Attribute type (“DROP_DOWN”, “COLOR”, etc.)productOptionDescription1: Semicolon-separated values (e.g., “Small;Medium;Large”)productOptionName2 through productOptionName6: Additional variation attributesproductOptionType2 through productOptionType6: Additional attribute typesproductOptionDescription2 through productOptionDescription6: Additional attribute values
Additional Information:
additionalInfoTitle1 through additionalInfoTitle6: Info section titles (e.g., “PRODUCT INFO”)additionalInfoDescription1 through additionalInfoDescription6: Info section contentcustomTextField1, customTextField2: Custom field namescustomTextCharLimit1, customTextCharLimit2: Character limitscustomTextMandatory1, customTextMandatory2: Required field flags
WooCommerce Product CSV Structure: WooCommerce product imports typically expect these fields:
Essential Fields:
ID: Product ID (leave empty for new products)Type: Product type (“simple”, “variable”, “grouped”, “external”)SKU: Stock Keeping UnitName: Product namePublished: Publication status (1 for published, 0 for draft)Is featured?: Featured status (0 or 1)Visibility in catalog: Visibility setting (“visible”, “catalog”, “search”, “hidden”)Short description: Brief product summary (often empty)Description: Full HTML product descriptionTax status: Tax handling (“taxable”, “shipping”, “none”)Tax class: Tax classification (often empty)In stock?: Stock status (1 for in stock, 0 for out of stock)Stock: Stock quantity (empty for unlimited)Backorders allowed?: Backorder setting (0 or 1)Sold individually?: Individual sale restriction (0 or 1)Regular price: Standard selling priceSale price: Discounted price (if applicable)Categories: Comma-separated category namesTags: Product tags (often empty)Images: Full image URLs (comma-separated for multiple images)Position: Menu order (0 for default)
Physical Product Fields (column names depend on store unit settings):
Weight (unit): Product weightLength (unit): Product lengthWidth (unit): Product widthHeight (unit): Product heightAllow customer reviews?: Review settings (1 to allow)Purchase note: Note shown after purchase
Note: The exact column headers for weight and dimensions depend on the unit settings configured in WooCommerce (WooCommerce > Settings > Products).
For example, weight may appear as Weight (kg), Weight (g), Weight (oz), etc., and dimensions may appear as Length (cm), Length (in), etc.
Advanced Fields:
Date sale price starts: Sale start dateDate sale price ends: Sale end dateLow stock amount: Low stock thresholdShipping class: Shipping classificationDownload limit: For digital productsDownload expiry days: For digital productsParent: Parent product for variationsGrouped products: Related product IDsUpsells: Upsell product IDsCross-sells: Cross-sell product IDsExternal URL: For external productsButton text: External product button textBrands: Brand taxonomy (if using brand plugins)Meta: _wtw_product_id: Custom meta field for tracking original Wix ID
- Open the Wix CSV file in Excel, Google Sheets, or similar
- Column headers matching WooCommerce format:
- Rename columns or add/remove columns according to the mapping tables below.
- Format data correctly:
- Make sure the data is formatted according to the data format tables below.
- Handle product variations, images and custom data (if applicable):
- Follow the guide below to handle advanced products configurations and images.
Core product fields
| Wix Field | WooCommerce Field | Transformation Notes |
|---|---|---|
| name | Name | Direct mapping |
| description | Description | Direct mapping (already HTML formatted) |
| sku | SKU | Direct mapping (use Wix SKU if available) |
| handleId | Meta: _wtw_product_id | Store original Wix ID for reference |
| price | Regular price | Direct mapping (decimal format) |
| discountValue + discountMode | Sale price | Calculate based on discount rules |
| inventory | In stock? | Convert: “InStock”→1, “OutOfStock”→0 |
| visible | Published | Convert: true→1, false→0 |
| weight | Weight (lbs) | Direct mapping if available |
| collection | Categories | Split semicolons, convert to comma-separated |
| ribbon | Tags | Convert product badges to tags |
| brand | Brands | Map to brand taxonomy if using brand plugins |
| cost | Custom meta field | Store as Meta: _cost if needed |
| surcharge | Custom meta field | Store as Meta: _surcharge if needed |
- Price and Discount Handling:
- Use Wix
pricefield as WooCommerceRegular price - Calculate sale price using
discountModeanddiscountValuefields - If
discountMode= “PERCENT”: Sale Price = Price × (1 – discountValue/100) - If
discountMode= “AMOUNT”: Sale Price = Price – discountValue
- Use Wix
- Stock Status Conversion:
- Convert Wix
inventoryvalues: “InStock” → 1, “OutOfStock” → 0 - Map to WooCommerce
In stock?field
- Convert Wix
- Visibility and Status:
- Convert Wix
visibleboolean to WooCommercePublished(true → 1, false → 0) - Set appropriate
Visibility in catalogbased on product status
- Convert Wix
| Wix Field | WooCommerce Field | Transformation Notes |
|---|---|---|
| productImageUrl | Images | Convert filename to full URL or download and re-upload |
Image Processing Steps:
- Handle Wix Image Filenames:
Option A: Keep Wix Media URLs (Quick Migration)
- Convert Wix image filenames to full URLs (e.g., “c837a6_f8d49ec34c8a4f95890362cc7a53f89b~mv2.jpg” → “
https://static.wixstatic.com/media/c837a6_f8d49ec34c8a4f95890362cc7a53f89b~mv2.jpg”) - Update CSV with complete Wix media URLs
- Pros: Fast migration, no additional storage needed
- Cons: Dependency on Wix servers, potential future broken links
Option B: Migrate to WordPress Media Library (Recommended)
- Convert Wix filenames to full URLs as above
- Download all images from Wix media URLs
- Upload images to WordPress media library via Media → Add New
- Update CSV with new WordPress media URLs (e.g., “
https://yoursite.com/wp-content/uploads/2024/01/product-image.jpg”) - Pros: Full control over images, better performance, SEO benefits
- Cons: Requires more time and storage space
Implementation Steps:
For Option A (Keep Wix URLs):
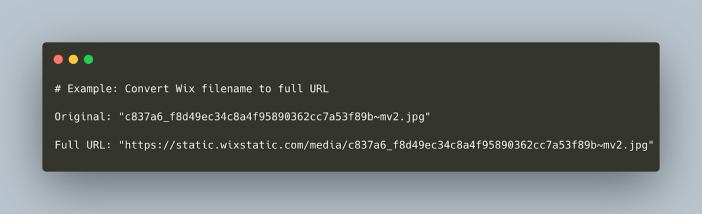
For Option B (WordPress Media Library):
- Create a list of all unique image URLs from your Wix CSV
- Use a bulk download tool or script to download all images
- Upload images to WordPress: Media → Add New → Drag and drop files
- Note the new WordPress URLs (format:
https://yoursite.com/wp-content/uploads/YYYY/MM/filename.jpg) - Create a mapping file: Wix URL → WordPress URL
- Use find/replace to update all image URLs in your CSV
- Optimize: Compress and optimize images for web performance
| Wix Field | WooCommerce Field | Transformation Notes |
|---|---|---|
| collection | Categories |