


WooCommerce includes a built-in CSV tool for importing, exporting, and bulk-updating products. Use it to add many products at once, move product data between stores, or update existing product details. This guide covers the CSV format, import and export steps, and common troubleshooting.
Locate the import and export tools
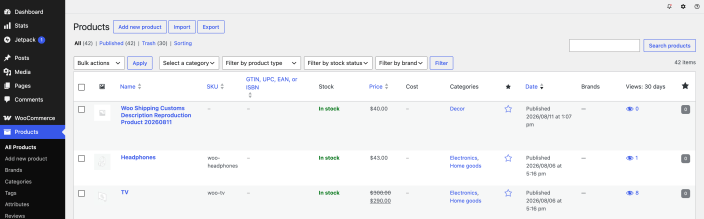
Go to Products > All Products. The Import and Export buttons appear beside Add new product.
- Add a product catalog to a new store.
- Update product details, schedule sale prices, or keep product data consistent across stores.
Note:
If you use the premium Product CSV Import Suite extension, follow the Product CSV Import Suite documentation.
Create your CSV
Recommended CSV editors
We recommend using:
Whichever editor you use, save or export the file as a UTF-8 CSV and follow the general guidelines below. Spreadsheet applications can change formatting or character encoding, so review the saved CSV before importing it.
Create a product CSV
To import new products or update existing products, you need a CSV containing your product information. You can:
- Export a CSV of products from an existing store.
- Download the sample product CSV from GitHub and replace the example values with information for your products.
- Create your own CSV. Use the formatting and columns in the product CSV import schema.
Note:
A CSV exported with WooCommerce already follows the required schema. If you start with the sample file, replace its example values while keeping the column names and formatting described in the product CSV import schema.
General guidelines
- Use UTF-8 encoding.
- Use the store’s local timezone for dates.
- Use
1for true and0for false when importing Boolean values. - Separate multiple values in a field with commas.
- See Comma handling below when importing category names that contain commas.
- Enclose a value in double quotation marks if it contains a comma.
- Prefix the ID with
id:if referencing an existing product ID. No prefix is needed if referencing a SKU. For example:id:100,SKU101. - Use
>between levels in a taxonomy hierarchy and commas between separate terms. - The
Publishedcolumn controls product status. Use1for published,0for private,-1for draft, or2for pending review. - You cannot assign a specific post ID to a new product during import. WooCommerce uses the next available ID, regardless of the ID in the CSV.
Comma handling
WooCommerce treats commas as field separators. Escape commas that are part of a single value so WooCommerce imports the complete value.
To import a single category named Places, People, Cities, escape its commas with backslashes: Places\, People\, Cities.
The backslashes tell the importer to treat the commas as part of the category name.
Images
- Images need to be pre-uploaded or available online to import to your store.
- You can use external image URLs when the images are directly accessible. WooCommerce imports these images into the Media Library. URLs behind redirect scripts, such as some cloud-storage links, are not supported.
- You can define the filename if the image already exists in the Media Library.
- The core CSV importer cannot add, edit, or update alt text for product images.
Import
Add new products
Use the CSV importer to add multiple products in one upload.
- Go to Products > All Products.
- Select Import at the top of the page to open the Upload CSV file screen.
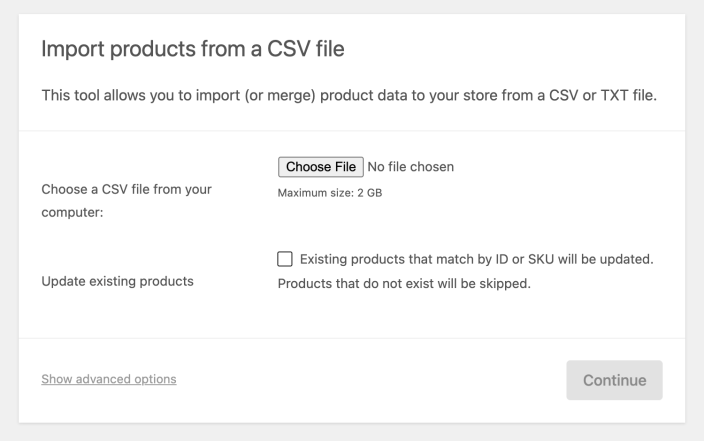
- Select Choose File and choose the CSV or TXT file you want to import. Alternatively, open Show advanced options and enter the path to a CSV file already on the server.
- Select Continue. The button remains unavailable until you select a local file or enter a server file path.
- Review the Column mapping screen. WooCommerce automatically maps recognized CSV columns to product fields.
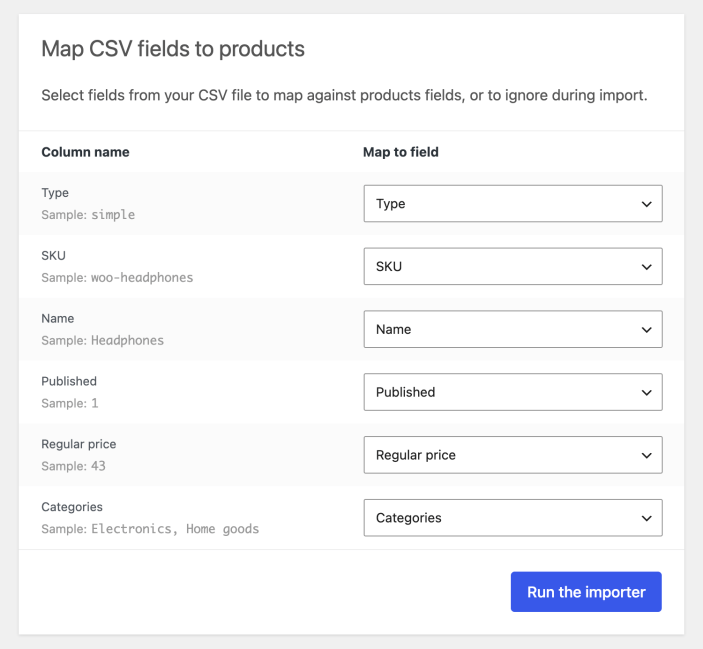
- Use the dropdown menus to adjust fields or choose Do not import for any column that should be ignored.
- Any unrecognized columns will not be imported by default.
- Select Run the importer.
- Wait until the import is finished. Do not refresh or navigate away from the page while the import is in progress.
Your product import is complete.
Update existing products
Use the CSV importer to bulk-update existing products, such as adding a brand, changing a tax class, preparing a sale, or synchronizing product data between stores. The importer uses product IDs or SKUs in the CSV to match existing products.
- Make a CSV file as outlined in the Create your CSV section, using the IDs or SKUs of the products you want to update.
- Go to Products > All Products.
- Select Import at the top of the page.
- Select Choose File and choose your CSV file.
- Select Update existing products. Existing products that match by ID or SKU are updated. Products that do not exist are skipped.
- Select Continue and review the Column mapping screen.
- Use the dropdown menus to adjust fields or choose Do not import for any column that should be ignored.
- Select Run the importer.
- Wait until the update is finished. Do not refresh or navigate away from the page while the import is in progress.
Your product update is complete.
Note: Starting in WooCommerce 11.1, a variation row that doesn’t match an existing product isn’t always skipped during an update import. If its Parent column matches an existing variable product and the row includes a SKU (or a GTIN, UPC, EAN, or ISBN if your CSV maps one) plus attributes and values the parent product already has, WooCommerce creates it as a new variation instead. A row missing any of these is skipped, the same as in earlier versions. See Add variations while updating a variable product for the full conditions.
Troubleshooting failed or skipped imports
If the import finishes but some products are missing or skipped, check the import log first. Common causes include:
- A product already exists with the same SKU or ID, and Update existing products was not selected.
- The CSV uses columns or values that do not match the product CSV import schema.
- The
Publishedvalue sets an unexpected product status. See thePublishedrow in the schema below for supported values, including pending review. - A plugin or theme conflict is interrupting the import.
- The CSV is too large for the server to process in one request. Split large CSV files into smaller batches and import each batch separately.
Troubleshooting upload errors
WordPress may misidentify the file type and display Sorry, this file type is not permitted for security reasons. This can happen on some servers when a CSV contains HTML.
First, confirm that the file is saved as a CSV. If the upload still fails, upload the CSV to your site’s uploads directory using SFTP or your host’s file manager. Then open Show advanced options in the importer and enter the server file path. Continue becomes available when the path is present.
If the server-path option also fails, ask your hosting provider to check the site’s allowed file types and upload configuration.
Importing large product catalogs
Large imports depend on your server’s available memory, upload limits, and processing time. Before importing a large catalog, create a backup and test a small import on a staging site. Split the CSV into smaller batches so problems are easier to find and fix.
The Maximum size value shown on the upload screen is set at the server level. To increase it, contact your hosting company.
For extensive imports or custom product data from extensions, consider Product CSV Import Suite.
Convert an existing simple product to a variable product
You can use the CSV importer to convert an existing simple product into a variable product. Starting in WooCommerce 11.1, you can do this in a single import if the parent product row comes before its variation rows in the CSV. On an earlier version, or if you can’t guarantee the row order, use two imports instead: one to update the existing product into a variable product with attributes, and another to add the variation rows as new products.
Before you start, create a backup or test on a staging site. Then create a simple product that has a SKU and price, and export that product from Products > All Products.
- Open the exported CSV file in a CSV editor.
- Keep the existing product row in place, and add one new row for each variation.
- In the parent product row, change the
Typevalue fromsimpletovariable. - In each variation row, set the
Typevalue tovariation. - Give each variation row its own unique
SKUandName. - Add the attribute columns needed for the variable product. For one local attribute named Size, add
Attribute 1 name,Attribute 1 value(s),Attribute 1 visible, andAttribute 1 global. - In the parent product row, list all available values in
Attribute 1 value(s), such asS, M. In each variation row, enter only the value for that variation, such asSorM. - Set
Attribute 1 visibleto1. SetAttribute 1 globalto0for a local product attribute, or1if the attribute is a global attribute already configured in your store. - In each variation row, set the
Parentvalue to the parent product SKU or ID.
| Row | Type |
SKU |
Parent |
Attribute 1 name |
Attribute 1 value(s) |
Attribute 1 visible |
Attribute 1 global |
|---|---|---|---|---|---|---|---|
| Parent product | variable |
tshirt |
Size |
S, M |
1 |
0 |
|
| Variation | variation |
tshirt-s |
tshirt |
Size |
S |
1 |
0 |
| Variation | variation |
tshirt-m |
tshirt |
Size |
M |
1 |
0 |
After editing the CSV, save it as a new CSV file.
If the parent product row comes before its variation rows in the CSV, run a single import with Update existing products selected. WooCommerce updates the existing product into a variable product and creates the new variations in the same import, provided each variation row has a unique SKU (or a mapped GTIN, UPC, EAN, or ISBN) and its Parent value matches the parent product.
If you can’t guarantee the row order, or you’re on a version earlier than WooCommerce 11.1, run two imports instead:
- First import the CSV with Update existing products selected. This updates the existing product into a variable product and adds the attribute data. Variation rows that do not already exist are skipped during this update import.
- Open the CSV again, remove the parent product row, and leave the variation rows in place.
- Import the variation-only CSV with Update existing products unselected. This creates the variations and attaches them to the parent product.
- After either method, open the product and confirm that it is now a variable product with the expected variations.
If the variations are not created, check that each variation has a unique SKU, that the Parent value matches the parent product SKU or an ID formatted as id:123, and that the attribute columns match the values used by the parent product. If you used the single-import method and no variations were created, also check that the parent product row appears before its variation rows in the CSV.
Prepare a supplier CSV for variable products
Supplier files often use different column names, identifiers, and attribute formats than WooCommerce expects. Normalize the file before importing it, and test a small sample before importing the full catalog.
- Decide whether you are creating new products or updating existing products. For updates, export a few existing products first and use that export to confirm the column names and identifiers in the supplier file.
- Choose a stable identifier for each parent product, such as its SKU or product ID. Give each variation its own unique SKU, and use the same parent identifier in every variation row.
- Normalize supplier headers and attribute values before importing the file. Remove leading and trailing whitespace, use one capitalization for each value, and map synonyms to one value. For example, convert
L,l, andLargeto the single value you want to use, such asLarge. Keep the attribute name and value spelling identical in the parent and variation rows. - Prepare one parent row with
Typeset tovariable, the parentSKUorID, and the complete set of attribute values. Add one child row for each variation withTypeset tovariation, a uniqueSKU, the parent value inParent, and the matching attribute value. For a local attribute, keepAttribute 1 name,Attribute 1 value(s),Attribute 1 visible, andAttribute 1 globalconsistent between the parent and variation rows. Use the exact column names from the Product CSV import schema. - Remove supplier-only columns, formulas, currency symbols, extra whitespace, and unsupported formatting. Save the cleaned file as a UTF-8 CSV. The built-in importer maps known product fields and columns prefixed with
meta:. Extension-specific fields require the relevant extension’s documentation, such as Product CSV Import Suite guidance for variations. - Back up the store, then test the import with one parent and a few variations on staging or a test site. Review the import results and open the parent product to confirm that its variations, attributes, prices, stock, and images are correct before importing the remaining rows.
- When the workflow requires separate parent and variation files, follow the two-import workflow: import or update the parent first, then import the variation rows. For repeat imports, keep stable IDs or SKUs. With Update existing products selected, matching IDs or SKUs are updated and rows with nonmatching IDs or SKUs are skipped. With it unselected, rows whose IDs or SKUs already exist are skipped.
If rows are skipped or the variation structure is not created, review the importer’s failed or skipped-row report. Check the parent ID or SKU, the variation SKUs, the Type and Parent values, and the attribute names and values. Correct the supplier file before importing it again. Supplier files that need preprocessing must be cleaned before upload; do not repeatedly import the full file until the small test succeeds.
Export
Export the current product catalog to a CSV file with the built-in product CSV tool.
- Go to Products > All Products.
- Select Export at the top of the page to open the Export Products screen.
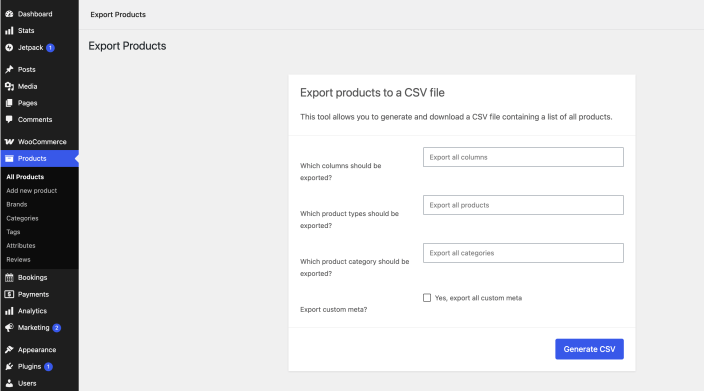
- Choose which columns should be exported, or leave the default Export all columns option selected.
- Choose which product types and product categories should be exported, or leave the defaults selected to export all products and categories.
- Select Yes, export all custom meta if you need product metadata from WooCommerce or other plugins. Metadata columns use a
meta:prefix. For example, metadata stored with theproduct_depthkey exports asmeta:product_depth. - Select Generate CSV and wait for the export to finish.
Your browser downloads the exported CSV file.
Variation names in exports
WooCommerce may exclude attribute values from variation names in exported CSV files. This is expected when a product has three or more attributes, or when it has two or more attributes and at least one attribute name contains two or more words.
Changing this behavior requires custom code with the woocommerce_product_variation_title_include_attributes filter. Customizations are developer-level work and are not covered under the WooCommerce Support Policy.
Selective product export
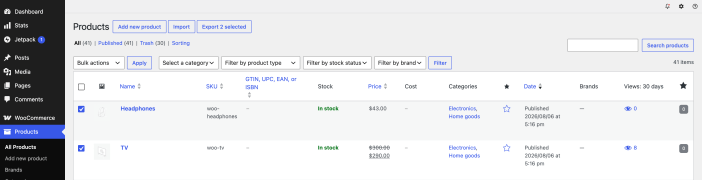
You can export selected products directly from the product list.
- Go to Products > All Products.
- Select the products you want to export.
- Select Export X selected at the top of the page. The button label shows the number of selected products.
Product CSV import schema
The built-in WooCommerce CSV importer and exporter use the following schema. You can also view the schema on GitHub.
| CSV column name | Maps to product property | Example | Notes |
|---|---|---|---|
ID |
id | 100 |
Identifies an existing product to update. You cannot assign a specific ID to a new product. |
Type |
type | simple, variation, virtual |
Supported values are simple, variable, grouped, external, variation, virtual, and downloadable. Separate multiple types with commas. |
SKU |
sku | woo-headphones |
Required. WooCommerce generates one if this value is omitted. |
Name |
name | Headphones |
Required. |
Published |
status | 1 |
Use 1 for published, 0 for private, -1 for draft, or 2 for pending review. You can also use true for published and false for draft. |
Is featured? |
featured | 1 |
Use 1 for true or 0 for false. |
Visibility in catalog |
catalog_visibility | visible |
Supported values: visible, catalog, search, hidden |
Short description |
short_description | This is a product. |
|
Description |
description | This is more information about a product. |
|
Date sale price starts |
date_on_sale_from | 2026-06-07 |
Uses the start of the specified day. Leave blank for no start date. |
Date sale price ends |
date_on_sale_to | 2026-06-14 |
Uses the end of the specified day. Leave blank for no end date. |
Tax status |
tax_status | taxable |
Supported values: taxable, shipping, none |
Tax class |
tax_class | standard |
Use the slug of an existing tax class. |
In stock? |
stock_status | 1 |
Use 1 for true or 0 for false. |
Stock |
manage_stock / stock_quantity | 20 |
A numeric stock level enables stock management. Use parent for a variation that inherits stock settings. Leave blank to disable stock management. |
Low stock amount |
low_stock_amount | 3 |
Leave blank or enter a number. |
Backorders allowed? |
backorders | 1 |
Use 1 for true, 0 for false, or notify. |
Sold individually? |
sold_individually | 1 |
Use 1 for true or 0 for false. |
Weight (unit) |
weight | 100 |
Parse only numbers. |
Length (unit) |
length | 20 |
Parse only numbers. |
Width (unit) |
width | 20 |
Parse only numbers. |
Height (unit) |
height | 20 |
Parse only numbers. |
Allow customer reviews? |
reviews_allowed | 1 |
Use 1 for true or 0 for false. |
Purchase note |
purchase_note | Thanks for your order. |
|
Sale price |
sale_price | 20.99 |
Sale price. |
Regular price |
regular_price | 24.99 |
Regular price. |
Categories |
category_ids | Electronics, Home goods > Audio |
Comma-separated list of categories. Use > for hierarchy. |
Tags |
tag_ids | Wireless, Audio |
Comma-separated list of tags. |
Shipping class |
shipping_class_id | Standard |
Name of the shipping class. |
Images |
image_id / gallery_image_ids | https://example.com/headphones.jpg, https://example.com/headphones-side.jpg |
The first image is the featured image. |
Download limit |
download_limit | 1 |
n/a or a limit. |
Download expiry days |
download_expiry | 1 |
n/a or a day limit. |
Parent |
parent_id | id:100, woo-headphones |
Parent product ID or SKU for a variation. Prefix an ID with id:. Exports use the SKU when possible. |
Grouped products |
children | id:100, id:101, woo-headphones, woo-radio |
Comma-separated list of product IDs or SKUs. Prefix each ID with id:. Exports use SKUs when possible. |
Upsells |
upsell_ids | id:100, id:101, woo-headphones, woo-radio |
Comma-separated list of product IDs or SKUs. Prefix each ID with id:. Exports use SKUs when possible. |
Cross-sells |
cross_sell_ids | id:100, id:101, woo-headphones, woo-radio |
Comma-separated list of product IDs or SKUs. Prefix each ID with id:. Exports use SKUs when possible. |
External URL |
product_url | https://example.com/products/headphones/ |
External product URL. |
Button text |
button_text | Buy now |
Custom text for an external product’s purchase button. |
Position |
menu_order | 1 |
Menu order, used for sorting. |
Attribute 1 name |
attributes | Color |
WooCommerce uses the matching global attribute, or a product-level attribute if no match exists. Add numbered columns for additional attributes. WooCommerce sets “Used for variations” automatically. |
Attribute 1 value(s) |
attributes | Blue, Red, Green |
Comma-separated list of values. A variation needs one value; if you provide more than one, WooCommerce uses the first. |
Attribute 1 default |
default_attributes | Blue |
Default value for variable products. |
Attribute 1 visible |
attributes | 1 |
Use 1 for true or 0 for false. The mapping screen labels this field Attribute visibility. |
Attribute 1 global |
attributes | 1 |
Use 1 for true or 0 for false. The mapping screen labels this field Is a global attribute? |
Download 1 name |
downloads | Download 1 |
|
Download 1 URL |
downloads | url.zip |
Custom columns and metadata
The built-in importer maps known schema columns and product metadata columns. Any unrecognized columns are not imported by default.
To import custom product metadata, prefix the CSV header with meta:. For example, use meta:product_depth for a custom field stored with the key product_depth. If WooCommerce does not map the column automatically, map it to Import as meta on the Column mapping screen.
Adding entirely new importer fields requires custom code. Customizations are developer-level work and are not covered under the WooCommerce Support Policy.
Questions and support
Do you still have questions and need assistance?
This documentation is about the free, core WooCommerce plugin, for which support is provided in our community forums on WordPress.org. By searching this forum, you’ll often find that your question has been asked and answered before.
If you haven’t created a WordPress.org account to use the forums, here’s how.
- If you’re looking to extend the core functionality shown here, we recommend reviewing available extensions in the WooCommerce Marketplace.
- Need ongoing advanced support or a customization built for WooCommerce? Hire a Woo Agency Partner.
- Are you a developer building your own WooCommerce integration or extension? Check our Developer Resources.