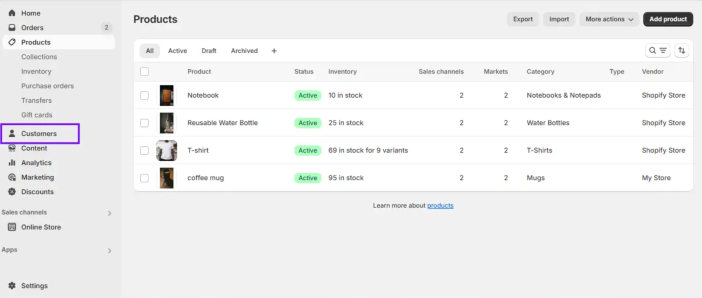


Introduction
This article outlines the benefits and challenges of migrating your ecommerce store from Shopify to WooCommerce. Switching to WooCommerce offers a compelling opportunity to unlock greater flexibility, scalability, and control, making it ideal for businesses looking to maximize their online potential.
Who this guide is for
– Store owners managing complex or straightforward catalogues (e.g., variable products like T-shirts with sizes/colors) who want to optimize their ecommerce operations.
– Developers who require fine-tuned control over data, design, and functionality will find this approach a good starting point.
Key benefits of WooCommerce
Switching from Shopify to WooCommerce provides distinct advantages that cater to businesses of all sizes:
- Open-source flexibility
WooCommerce, built as an open-source plugin for WordPress, empowers you with limitless possibilities. Unlike Shopify’s closed ecosystem, you can tweak every aspect of your store — code, design, and functionality — to align with your unique vision. - Complete control over hosting and data
With WooCommerce, you’re not locked into a hosted platform like Shopify. You can choose a hosting provider that meets your business requirements with managed WordPress hosting optimized for WooCommerce for a seamless setup. You’ll also retain complete ownership of your store’s data and infrastructure. - Cost-effectiveness for scaling
Shopify offers a subscription-based model with additional costs that may apply depending on your payment provider, apps, or themes. WooCommerce, on the other hand, is open-source and free to start with, offering flexibility in choosing extensions and services as your store grows.
For payments, WooCommerce offers WooPayments, a fully integrated solution that simplifies transactions with competitive rates, support for recurring payments, over 100 currencies supported, and unified dashboard management. This helps store owners streamline operations as they grow. - A wide range of customizations and added functionality
WooCommerce integrates seamlessly with WordPress’s robust content management system, combining ecommerce with advanced blogging, SEO tools (e.g., Jetpack Boost), and marketing features. With thousands of plugins, extensive themes, and direct code access, you can tailor your store to meet any need, far beyond Shopify’s predefined templates and controlled app marketplace.
Shopify offers a user-friendly, all-in-one hosted solution, but its simplicity has trade-offs. Its subscription model and added fees can strain budgets as your store scales, while customization is restricted to what its ecosystem allows. Shopify retains control over your store’s backend and data, limiting creativity and locking you into its ecosystem.
WooCommerce: A flexible alternative
By contrast, WooCommerce hands you the reins. Host it anywhere, customize it endlessly, and integrate it with WordPress’s powerful tools — all while avoiding Shopify’s recurring costs and restrictions. The active WordPress community and extensive documentation further ensure you’re supported every step of the way.
WooCommerce support and community
WooCommerce benefits from a large, passionate, and active global community. Whether you need troubleshooting help, development advice, or inspiration, resources are always within reach:
- Extensive official documentation and tutorials.
- A responsive support ticket system for premium extension users.
- A vast number of developers, freelancers, and agencies are experienced in WooCommerce.
- Community forums, Slack groups, and local WordCamps where you can connect with fellow store owners and WordPress experts.
This vibrant ecosystem ensures that you’re never alone, whether building your first store or scaling an existing one.
Migration overviewThe migration process from Shopify to WooCommerce typically involves:
- Backing up your Shopify data to ensure all information is preserved before making any changes.
- Setting up WordPress and WooCommerce as your new ecommerce platform.
- Transferring store data, including products, customers, and orders.
- We’ll start by walking you through a manual CSV import process for products — ideal for users who prefer full control or want to better understand what’s happening behind the scenes.
- For customers and orders, we’ll use free WordPress plugins that simplify the process without requiring advanced technical knowledge.
- Finally, we’ll introduce a more streamlined, all-in-one solution using the Migrate & Import Shopify to WooCommerce plugin — the most scalable and efficient way to handle the full migration in one place.
While the manual method offers transparency and flexibility, it has limitations in terms of time and complexity. That’s why we ultimately recommend the plugin route for most users, but we’ll cover both paths in detail so you can choose what works best for your needs.
- Setting up essential store functionality, such as WooPayments, which supports major credit and debit cards, Apple Pay, Google Pay, and various local payment methods.
- Customizing your WooCommerce store using themes and plugins to match your brand’s look and feel.
- Testing and launching your new store with confidence.
Pre-migration planning
1. Assess current Shopify setup
Ensure you have full access to your Shopify admin dashboard. This is essential for managing your store, exporting necessary data, and generating credentials (like API keys) required for a smooth migration to WooCommerce. Without full access, you may face limitations when retrieving critical data or setting up integrations.
API Key: A unique code allowing different applications (like WooCommerce) to securely access and interact with your Shopify store data. It’s like a password that ensures only authorized applications can make changes or retrieve information.
Before moving forward, review the WooCommerce hosting requirements to ensure compatibility. Choose a provider that offers scalability, regular backups, and WooCommerce-friendly support.
3. Domain and SSL considerationsDecide whether you’ll transfer your domain or just update the DNS settings to point to the new WooCommerce site.
Next, an SSL certificate will need to be set up to enable HTTPS and secure customer data, protecting sensitive information during transactions and improving SEO.
Refer to the WooCommerce SSL Setup Guide for configuration steps.
Domain: A domain is the web address where your store is accessible, such as yourstore.com. It is essentially the “name” of your website that people type into their browser to access your site. During migration, you may need to point your domain to your new WooCommerce store’s hosting provider.
SSL Certificate (Secure Sockets Layer Certificate): An SSL certificate ensures that all data transferred between your website and users is encrypted and secure. It’s essential for protecting customer information during transactions and is a must-have for any ecommerce store. Most web hosting providers offer SSL certificates, and modern browsers display a padlock symbol to indicate that a website is secure with an SSL certificate. Install and activate an SSL certificate on your WooCommerce store before going live to ensure data security and build customer trust.
DNS (Domain Name System): A system that translates human-friendly domain names (like yourstore.com) into machine-readable IP addresses. It’s essential for routing traffic to the correct server during and after migration.
4. Back up your Shopify data- Export product data
From your Shopify admin, go to Products > Export, then choose the products you want to export (all, selected, current page, or filtered). Select a CSV format compatible with spreadsheet editors like Excel or Google Sheets.- Why It’s useful: This CSV backup contains product titles, descriptions, variants, prices, and inventory. It’s helpful if products are not accidentally deleted when editing in bulk offline or importing them into another platform.
- Best practices: Since product images are not embedded in the CSV and are instead referenced by URL, ensure that these image URLs remain accessible online. Regularly save the CSV in UTF-8 format to preserve characters and store it on cloud storage with version history or encrypted local drives for security.
CSV (comma-separated values): A file format commonly used to export and import data. It organizes information (like products or customer data) in a table format, where each line represents a data record and commas separate each value.
Check Shopify documentation for more information:
https://help.shopify.com/en/manual/products/import-export/using-csv
https://help.shopify.com/en/manual/products/import-export
- Save customer and order data
- Customer Data: Go to Customers > Export your selection (all, current page, selected, or filtered). This CSV includes names, emails, addresses, and tags.
- Order Data: Navigate to Orders > Export your desired range (all orders, orders by date, or selected). Order CSVs can include transaction histories and may be emailed if the volume is large.
- Why It’s Useful: These backups preserve your buyer history, which is helpful for sales analysis or importing into CRMs. However, due to security rules, passwords can’t be exported.
- Best Practices: Use the UTF-8 format to preserve special characters. Store these files on secure, access-controlled cloud drives. Update your backups regularly to reflect new orders and customers.
UTF-8 Format: UTF-8 (Unicode Transformation Format) is a character encoding standard that allows you to store and display a wide variety of characters from different languages and scripts. It’s widely used in web applications, databases, and file formats (including CSV) to ensure that text is accurately interpreted across different platforms and languages. During migration, ensure that any exported data, such as product names, descriptions, and customer details, is encoded in UTF-8 to prevent character issues, like garbled text, when importing it into WooCommerce.
- Back up theme files and media
- Theme files
- In your Shopify admin, go to Online Store > Themes, locate your active theme, click “Actions” > “Download theme file,” and save the resulting zip file.
- This ZIP contains template files, JavaScript, CSS, layout settings, and liquid templates. It’s your store’s complete design code, allowing you to restore or migrate the look and feel of your site.
CSS (Cascading Style Sheets): CSS is a stylesheet language used to describe the presentation (look and feel) of a document written in HTML or XML, such as the pages of your website. It controls the layout, colors, fonts, and overall design of your store. CSS defines how your web pages should appear across different devices, ensuring a responsive design. When migrating, you may need to adjust or reapply your existing CSS styles to your WooCommerce theme to maintain the visual consistency of your store.
JavaScript: JavaScript is a programming language used to create interactive effects within web browsers. It enables dynamic features like product sliders, form validation, pop-ups, and user interactions on your site. When migrating to WooCommerce, you may need to update or reimplement custom JavaScript scripts to ensure they function correctly with your new WooCommerce store. This is especially true if JavaScript is used for features like product filters or pop-up modals that were powered by certain Shopify features.
- Media files
Shopify doesn’t bundle media (like product images, banners, or blog images) in its exports. You must:- Manually download media from:
- Product pages (image URLs in the CSV).
- Content > Files section in the Shopify admin.
- Or use third-party tools or browser extensions to download image assets from URLs in batches.
- Why you should back up
These backups are essential for rebuilding your storefront, especially if files are corrupted or deleted during migration.- Identify and securely store:
- Product images.
- Banner images.
- Logo and favicon.
- Blog images.
- Uploaded files in content/files.
- Storage tips:
- Organize backups into folders by type, such as theme, media, products, etc.
- Use cloud storage with access control (e.g., Google Drive, Dropbox Business).
- Optionally, keep a local encrypted copy on a secure external drive for redundancy.
- Identify and securely store:
- Manually download media from:
- Check Shopify documentation for more information:
https://help.shopify.com/en/manual/online-store/themes/managing-themes/downloading-themes
- Theme files
Setting up WooCommerce
1. Install WordPress and WooCommerce
WooCommerce is a plugin that extends WordPress into a fully featured ecommerce platform. Before you can use WooCommerce, you must install WordPress on your hosting server.
- Installation steps:
- Follow the Official WordPress Installation Guide.
- After WordPress is installed, install the WooCommerce plugin from the WordPress plugin directory.
- Check out the WooCommerce Setup Guide for help configuring basic settings such as currency, shipping, and payment gateways.
This setup gives you flexibility and control but requires more manual configuration compared to all-in-one platforms like Shopify.
2. Select a themeWith the core setup complete, the next step is choosing a theme that dictates your store’s design and user experience.
- How to choose a theme:
- Go to Appearance > Themes in your WordPress admin dashboard.
- Click Add New and search for a WooCommerce-ready theme.
- For a lightweight and highly compatible theme, check out Storefront, the free, official WooCommerce theme.
- For additional themes, check out our selection of themes on WooCommerce.com. Alternatively, browse the WordPress.org theme directory, which offers a wide variety of free and premium themes designed for WooCommerce.
- Preview themes to ensure they support your store’s needs (e.g., product grids, cart pages, variable product displays).
- Install and activate your chosen theme.
- Customize to match your Shopify store’s branding.
- Navigate to Appearance > Customize to access the WordPress Customizer.
- Adjust key elements to mirror your Shopify store:
- Logo: Upload your existing logo under Site Identity.
- Colors: Set primary, secondary, and accent colors (e.g., via Colors or Additional CSS) to match your Shopify palette.
- Typography: Choose fonts that align with your brand (e.g., via Typography settings or a plugin like Easy Google Fonts if needed).
- Layout: You can configure headers, footers, and product page layouts to replicate your Shopify design, such as sidebar placement and button styles.
- Use the theme’s WooCommerce-specific options (if available) to tweak shop pages, product listings, and checkout design.
- Preview changes live and publish once satisfied.
- For more in-depth customization, edit CSS or template files via Appearance > Theme Editor (make a backup first) or use a child theme to preserve updates.
Plugins extend the functionality of your WooCommerce store. While the core plugin covers basic ecommerce needs, additional tools enhance customer experience, performance, visibility, and security.
- Recommended categories:
- SEO (Search Engine Optimization): Helps search engines find and rank your products, driving organic traffic. Look for extensions that support meta tags, schema markup, and sitemaps.
- Security enhancements: Protects your store from unauthorized access, malware, and fraud. Standard features include firewall integration, login protection, and monitoring tools.
- Performance tools: Improve loading speed and optimize images for a better user experience.
- Backup solutions: Regularly back up your files and database to avoid data loss and ensure business continuity.
- Migration assistance: If you’re still transitioning from Shopify, consider plugins that streamline the import of products, customers, and orders.
- Business services: Discover a handpicked selection of essential services to support and grow your business.
- When selecting plugins:
- Review ratings, update history, and compatibility with your current WordPress version.
- Prioritize plugins from reputable developers or the official WordPress plugin repository.
Note: To keep your site lightweight and secure, only install plugins you need.
Resources and guides:
- A beginner’s guide to ecommerce SEO.
- Security for WooCommerce.
- Migrate & Import Shopify to WooCommerce.
Data migration process
Migrate products
You can check the Product CSV Importer and Exporter documentation for detailed instructions and guidance.
Manual migration allows you to export data from Shopify, edit it in a spreadsheet, and then import it into WooCommerce. This method gives you complete control and is ideal for customizing data. Below, we detail the steps with sample CSV files for a simple product (a “Ceramic Coffee Mug”) and a variable product (a “Cotton T-Shirt” with size and color variations).
Before proceeding with any critical actions, make sure to follow these two essential best practices:
- Back up your WooCommerce database before starting any import process.
- Run a test import with a small file to verify everything works correctly before importing the full dataset.
- Log in to your Shopify admin.
- Go to Products > Export.
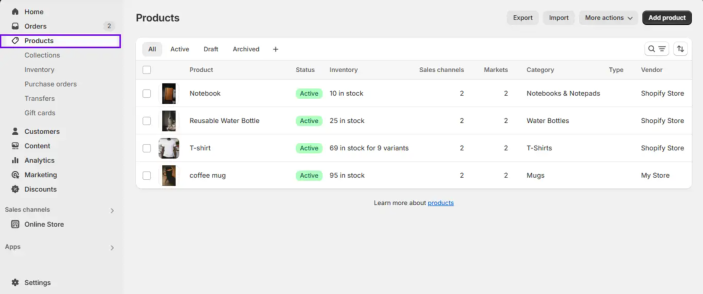 Shopify’s Export Products menu
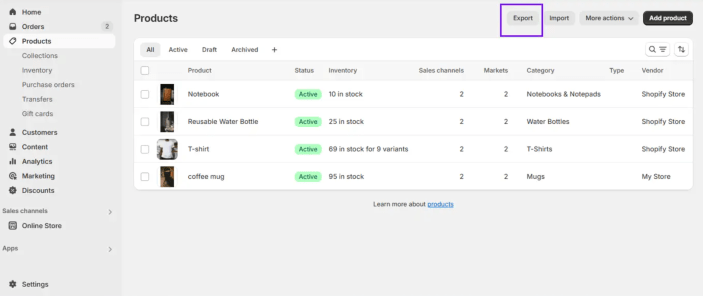 Click on ‘Export’ to download your product CSV file
- Select all products or filter by category (e.g., “Mugs” or “Apparel”).
- Choose CSV for Excel, Numbers, or other spreadsheet programs.
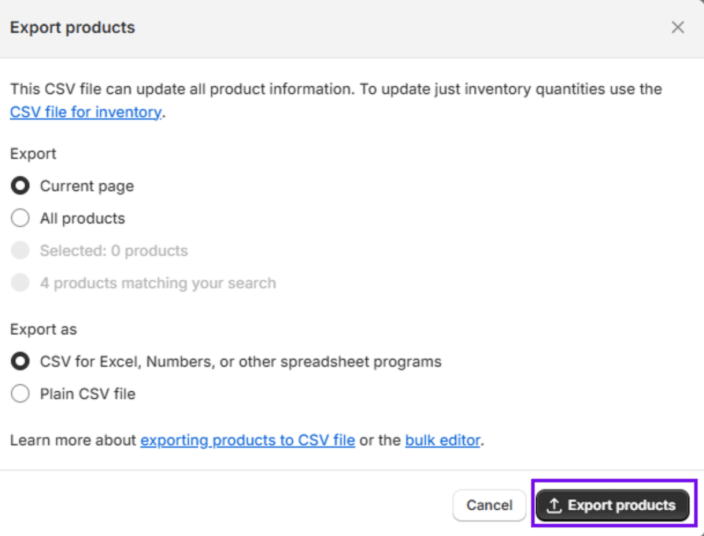 Choose your desired export format (CSV) in Shopify
- Click Export products and download the file (e.g.,
products_export.csv).
When moving from Shopify to WooCommerce, your product data is the backbone of the transition. Shopify’s structured export provides a wealth of fields, while WooCommerce’s flexible framework lets you refine and expand them. Let’s break down the process using sample Shopify data and show how it transforms in WooCommerce.
Shopify product data overview
Shopify’s product export includes extensive columns, such as:
- Handle: A unique URL slug (e.g., coffee-mug).
- Title: Product name (e.g., coffee mug).
- Body (HTML): Description with formatting (e.g., <p>Crafted from high-quality materials…</p>).
- Vendor: Supplier or brand (e.g., My Store).
- Product Category: Taxonomy (e.g., Home & Garden > Kitchen & Dining > Tableware > Drinkware > Mugs).
- Variant SKU: is a stock-keeping unit (e.g., CCM001 for a coffee mug).
- Variant Price: Price per variant (e.g., 15.99).
- Variant Inventory Qty: Stock level (e.g., 95).
- Image Src: Image URL (e.g., https://cdn.shopify.com/…/coffee.jpg).
- Option1 Name/Value: Variant options (e.g., Color/white for a T-shirt).
- SEO Title/Description: Search engine fields for optimization.
For variable products (e.g., the “Cotton T-Shirt”), Shopify repeats the product row for each variant, linking options like size and color to metafields. This structure is detailed but rigid, tied to Shopify’s ecosystem.
Transitioning to WooCommerce
WooCommerce organizes products differently, using a parent-child model for variables and a streamlined set of core columns. Here’s how the Shopify columns map to WooCommerce equivalents:
| Shopify Column | WooCommerce Field | Explanation | Example |
|---|---|---|---|
| Title | Name | Use the Title as the display name. | Ceramic Coffee Mug |
| Body (HTML) | Description | Transfer the HTML description directly. | <p>Crafted from high-quality...</p> |
| Product Category | Categories | Map Shopify’s detailed taxonomy to WooCommerce’s Categories. | Home & Garden > Kitchen > Mugs |
| Variant Price | Regular Price | Map the Variant Price to the Regular Price. | 15.99 |
| Variant Inventory Qty | Stock | Transfer stock levels to WooCommerce’s stock field. | 95 |
| Image Src | Images | Import image URLs for products. | https://example.com/mug.jpg |
| Option1 Name/Value | Attribute 1 Name/Value | Convert Shopify’s variant options to WooCommerce attributes. | Size/S, M, L |
New WooCommerce columns
| WooCommerce Column | Description | Example |
|---|---|---|
| ID | Auto-generated by WooCommerce (e.g., 205 for a mug). | 205 |
| Type | defines the product type, such as simple or variable, depending on whether the product has variations like size or color. | simple, variable |
| Parent | Links variants to their parent product (for variables). | id:67890 |
| Visibility in Catalog | Determines whether the product is visible in the catalog. | visible |
Recommended WooCommerce structure
Based on the sample data, your WooCommerce product import might look like this:
| Column | Value |
|---|---|
| ID | 205 |
| Type | simple |
| SKU | CCM001 |
| Name | Ceramic Coffee Mug |
| Published | 1 |
| Description | <p>Crafted from high-quality...</p> |
| Stock | 100 |
| Regular Price | 15.99 |
| Categories | Home & Garden > Kitchen > Mugs |
| Images | https://example.com/mug.jpg |
For a variable product
| Column | Value |
|---|---|
| ID | 67890 |
| Type | variable |
| SKU | CTSH |
| Name | Cotton T-Shirt |
| Description | <p>As an expert in the garment...</p> |
| Categories | Women > Shirts |
| Images | https://example.com/tshirt.jpg |
| Attribute 1 Name | Size |
| Attribute 1 Value(s) | S, M, L |
| Variation ID | 67891 |
| Stock | 50 |
| Regular Price | 19.99 |
Shopify’s exhaustive column list offers a solid starting point, but its rigidity limits customization. WooCommerce simplifies the structure while adding flexibility — attributes replace repetitive rows, and custom fields (e.g., for vendor) unlock new possibilities. Migrating involves exporting Shopify data as a CSV file, reformatting it to match WooCommerce’s structure, and setting up WooCommerce to meet your store’s specific needs. This shift empowers you to manage inventory, tailor categories, and optimize SEO without platform constraints, making it ideal for scaling your business.
Two examples
- Simple Product Example: Ceramic Coffee Mug
A simple product has no variations. Here’s how its CSV might look after editing: Simple Products. - Variable Product Example: Cotton T-Shirt
A variable product has attributes, such as size and color. You’ll need one row for the parent product and additional rows for each variation: variable product
By copying the variable and straightforward product files, we can merge the two tables into a new file called “All Products”, allowing us to import all the products simultaneously.
All Products
Tips
- Remove Shopify-specific columns, such as
"Handle"or"Vendor". - Use
'simple'for single products and'variable'or'variation'for products with options. - Map attributes (e.g.,
Size) and their values (e.g.,S, M, L) for variable products — this will be explained later. - Save the file as
products.csv. - Ensure that the images you entered have valid image URLs.
- In WordPress, go to WooCommerce > Products.
- Click Import at the top.
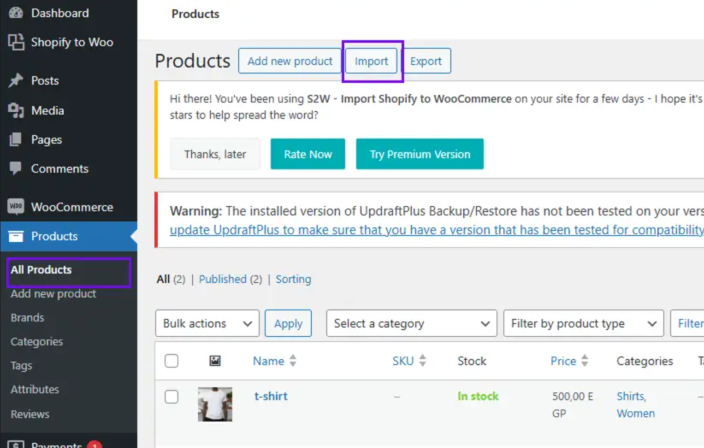 The WooCommerce product import screen. Click on ‘Import’ to begin the process.
- Upload
products.csv.
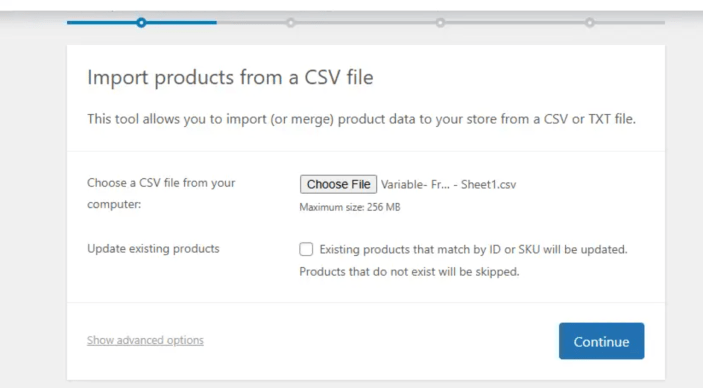 Select the CSV file for uploading, and ensure that you enable the updating of existing products.
- Map columns: Match the fields from your CSV to WooCommerce product fields (e.g., “Name” to “Product Title”, “Regular Price” to “Price”).
What is mapping?
Mapping is the process of matching fields (columns) from your Shopify export file to the corresponding fields in WooCommerce. Since the two platforms use different database structures, direct column-to-column mapping isn’t always possible. You will need to understand how to adapt the data structure from one system to the other.
Step-by-step mapping process1. Understand Shopify’s data structure
Shopify exports data using its own structure, while WooCommerce requires different fields or data formats. Let’s start by looking at key Shopify fields and how they correspond to WooCommerce fields:
Shopify product data mapping
| Shopify Column | WooCommerce Field | Explanation | Example |
|---|---|---|---|
| Handle | Product Slug | Shopify uses a unique identifier for products in the URL (handle), which is used to create the product’s URL slug in WooCommerce. | coffee-mug (Shopify) > coffee-mug (WooCommerce) |
| Title | Product Name | The title of the product is the most crucial field for identification. | Ceramic Coffee Mug |
| Body (HTML) | Product Description | The detailed description of the product, including HTML formatting. | <p>This mug is crafted from high-quality...</p> |
| Product Type | Product Type | Use the product type from Shopify (if available) as a taxonomy in WooCommerce. | Mugs (Shopify) > Mugs (WooCommerce) |
| Variant SKU | SKU | The SKU for each variant. Map each variant’s SKU directly into the WooCommerce SKU field. | CCM001 (Shopify) > CCM001 (WooCommerce) |
| Variant Price | Regular Price | The price of the variant in Shopify becomes the regular price in WooCommerce. | 15.99 (Shopify) > 15.99 (WooCommerce) |
| Variant Inventory Qty | Stock | The inventory quantity for the product or variant in Shopify will map to the stock field in WooCommerce. | 100 (Shopify) > 100 (WooCommerce) |
Mapping variable products:
For variable products (e.g., a T-shirt with size and color options), Shopify exports data in a more complex format:
| Shopify Column | WooCommerce Field | Explanation | Example |
|---|---|---|---|
| Option1 Name | Attribute 1 Name | Shopify exports variant options using ‘Option’ columns, such as Size and Color, to represent different product variations.. These need to be mapped to WooCommerce product attributes. | Size (Shopify) > Size (WooCommerce) |
| Option1 Value | Attribute 1 Value(s) | The specific value for each option (e.g., S, M, L for size) should be mapped to the corresponding values for that attribute. | S, M, L (Shopify) > S, M, L (WooCommerce) |
| Variant Price | Regular Price (variation) | The price for each variant will be mapped to the respective variation’s price in WooCommerce. | 19.99 (Shopify) > 19.99 (WooCommerce) |
| Variant SKU | SKU (variation) | Each variant’s unique SKU should be mapped accordingly. | CTSH-S (Shopify) > CTSH-S (WooCommerce) |
2. Shopify to WooCommerce column mapping
Here’s a more detailed look at mapping the Shopify fields to WooCommerce:
| Shopify Column | WooCommerce Field | Explanation | Example |
|---|---|---|---|
| Handle | Product Slug | The handle is used to create the product’s URL slug. WooCommerce requires this to identify the product URL. | coffee-mug (Shopify) > coffee-mug (WooCommerce) |
| Title | Product Title | The product name in Shopify is mapped directly to WooCommerce’s product title. | Ceramic Coffee Mug (Shopify) > Ceramic Coffee Mug (WooCommerce) |
| Body (HTML) | Product Description | Shopify’s HTML body content should be mapped to WooCommerce’s product description field. | <p>Crafted from high-quality...</p> (Shopify) > Crafted from high-quality... (WooCommerce) |
| Product Type | Product Categories | Shopify’s product categories (if defined) map to WooCommerce’s product categories. Categories may need to be restructured. | Mugs (Shopify) > Mugs (WooCommerce) |
| Product Vendor | Product Brand | If Shopify has a ‘vendor’ field, map it to a custom product attribute or brand in WooCommerce. | My Store (Shopify) > My Store (WooCommerce) |
| Variant Price | Regular Price | Shopify’s price column for variants corresponds to WooCommerce’s regular price field for the associated product or variation. | 15.99 (Shopify) > 15.99 (WooCommerce) |
Mapping strategy
- Map
IDto the product’s unique identifier in the system. - Map
Typeto the product type field. - Map
SKUto an inventory-tracking field. - Map
Nameto the title field. - Set
Visibility in the Catalogbased on whether the product is public or private. - Map the
Description and Short Descriptionfields to the corresponding product description fields in your store. - Map the
'Date Sale Price Starts'and'Date Sale Price Ends'fields to the product’s pricing schedule to control when sale prices become active and expire. - Assign
Tax StatusandTax Classbased on location-specific tax rules. - Map
Stockfields to the inventory management system. - Assign
dimensions and weightfor accurate shipping calculations. - Enable
or Disable Customer Reviewsbased on settings. - Map
Regular PriceandSale Priceto the pricing database.
- Organize
CategoriesandTagsfor easy navigation. - Store
Shipping Classfor proper shipping calculations. - Link
Imagesvia URLs to product media. - Associate
UpsellsandCross-sellswith recommendation logic to suggest relevant products to customers based on their preferences and purchasing behavior.. - Use an
External URLfor affiliate or external product listings. - Map the
Attribute NameandValuesto variation logic to define product options, such as size, color, or material, for each variation. - Ensure
Attribute Visibilityis enabled if you want the attribute to be displayed on the front end. - Use
Global Attributefor predefined attribute sets. - Set a
Default Attributefor predefined selections to automatically apply a specific option, such as size or color, when a customer views the product.
- Click “Run the Importer” and wait for the process to complete.
Note: You’ll receive a message and link to the log if an error occurs.
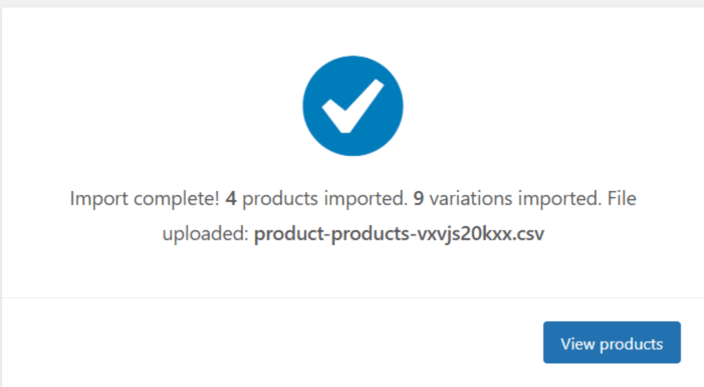 Monitor the import progress and check for any error messages if necessary.
- Visit Products to verify that the mug and T-shirt appear accurately.
 Visit the Products section in your WooCommerce store to ensure your items have been imported.
Migrating customers and orders: Two options
Visit the Products section in your WooCommerce store to ensure your items have been imported.
Migrating customers and orders: Two options
When it comes to migrating customers and orders to WooCommerce, there are two main approaches to consider:
- Manual migration using free plugins
This method involves using plugins available in the WordPress repository. These tools are free and can handle exporting and importing customer and order data. However, they may require more manual configuration and have some limitations depending on your specific use case. - Premium WooCommerce extension
WooCommerce also offers a premium extension called Customer/Order/Coupon CSV Import Suite. This tool provides advanced import features and better handling of complex data structures. You can learn more about how it works in their official documentation.
We will continue by exploring the free plugin method, guiding you through the steps to perform a manual migration using tools from the WordPress plugin repository.
Migrate customer data1. Export customers from Shopify- In your Shopify admin, navigate to “Customers” and select “Export”.